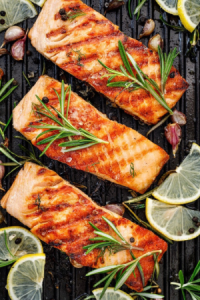
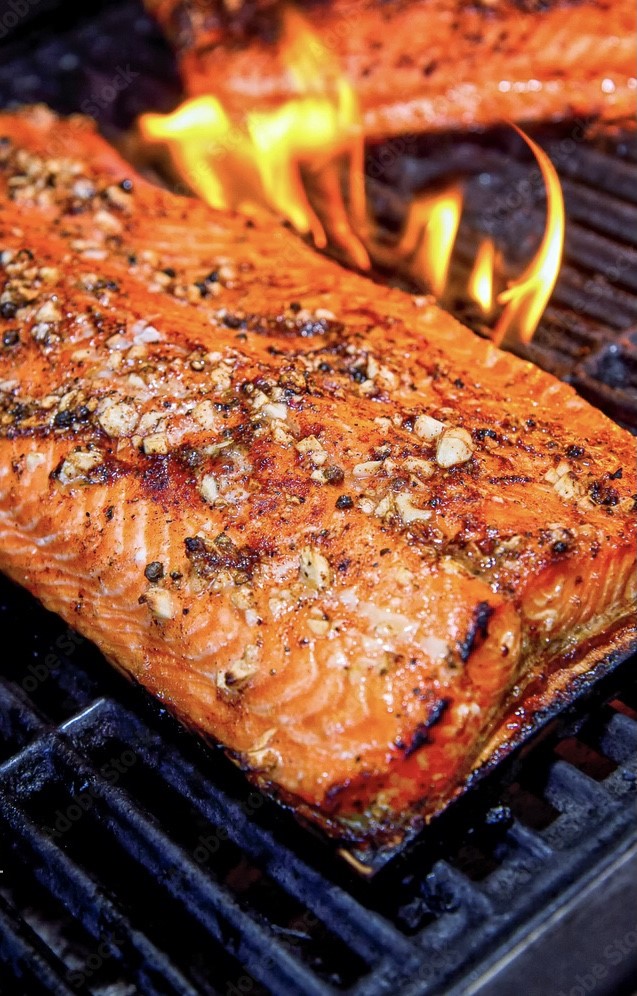
Grilling Series #4: How to Grill Fish

How To Grill Fish

Nothing compares to seafood on the grill. Something about the smoky flavor works so well. Grilling seafood is easier than you think. Once you get the taste of it, you’ll be hooked. 

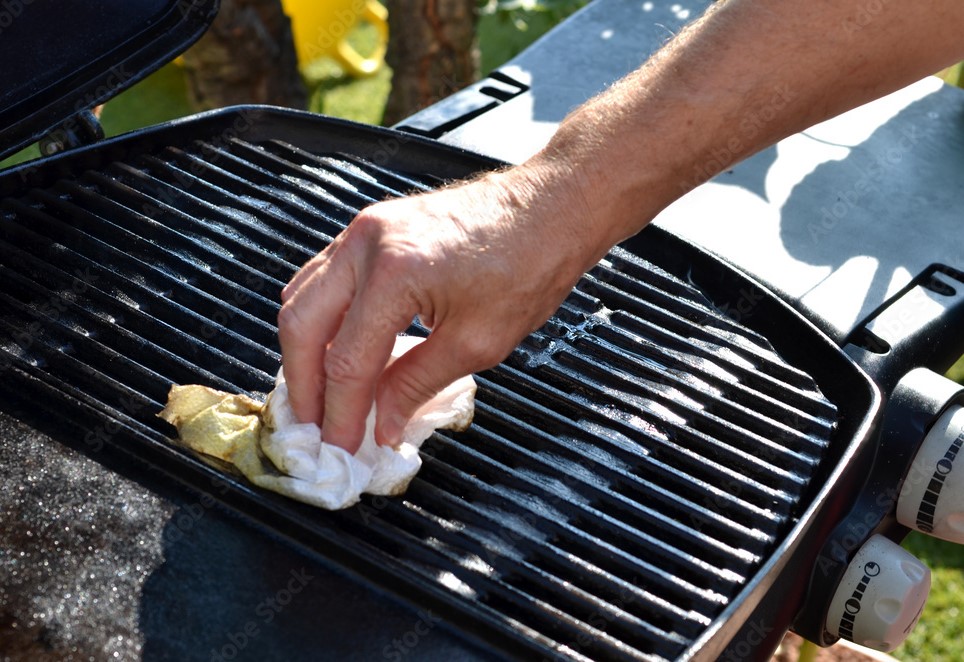
One: It Starts with a clean, well-oiled grill

Make sure you’re starting with CLEAN grill grates — scrape well to remove any crusted-on carbon from your last cook.

Before you add a single fish fillet or piece of seafood, rub the grates where they’ll go with a well-oiled paper towel. If you have ever experienced fish sticking in the past, one of the main reasons could be an uncleaned grill. 

Now that you have a cleaned grill, you’ll want to generously oil the grates.  Pour vegetable oil a onto a paper towel and wipe it on the grill grates. 

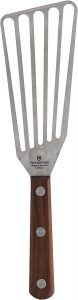
 Two: Use the Right Tools 

The fish spatula is a must-have tool in every chef’s arsenal, and it can be used for a variety of everyday cooking tasks other than fish. Due to its blade-like edge and thin metal flipper, it’s the best spatula for sliding under food without accidentally shoving into it. These features can make the difference between a clean flip and a shredded chunk of meat if a piece of chicken or fish is slightly stuck to the pan. A good fish spatula can handle half-pound burgers and flip pancakes as effortlessly as it can turn delicate fish fillets. It’s one of those fantastic, low-cost, yet endlessly useful kitchen tools.

Three: Be sure to preheat your grill on high for 10-15 minutes.

When grilling anything, especially fish, the first thing to do is to get the grill hot. This accomplishes several things. Increasing the grill’s temperature will aid in caramelizing the fish and creating the distinct grill marks that give grilled foods their distinctive flavor. Preheating the grill will also cut down on the time your fish spends there, reducing the chance that it will dry out. Last but not least, preheating the grill will eliminate fish grillers’ biggest worry: sticking.

Whether skin is on or off, the temperature should be at a medium to high heat, depending on the recipe, around 400-450 degrees Fahrenheit. Even though fish is very lean, if the grill was properly warmed, it will naturally detach itself from the grilling grate when it is done.  

Now that your grill is preheated, you’re almost ready to start grilling your fish. The last thing to do is clean the cooking grates with a stainless-steel brush to remove all prior cooking debris that may still be left over. Just a good rule of thumb, clean cooking grates are a necessity no matter what you are grilling to aid in easy removal of your grilled cuisine. If you’ve experienced fish sticking to the grates in the past, chances are you didn’t preheat your grill to the correct grilling temperature, or clean your cooking grates properly.

Four: This is the most important thing: DON’T flip your fish too early!

This is how fillets fall apart. If you’re fighting to get your spatula under your fillet then it is NOT ready. When grilling a filet with skin, we grill the flesh side first for 70% of the total cooking time, and then flip it to the skin side for the remainder of the time.

Grilling time for a filet will be about 10 minutes per inch of thickness. However, be sure refer to your recipe’s instructions Always remember to grill with your lid down. Each time you open the lid, you add additional cooking time to your meal.

Love this blog? Share away!

Share on facebook
Facebook
Share on pinterest
Pinterest
Share on whatsapp
WhatsApp
Share on print
Print
Share on email
Email

Grilling Series #3: How To Grill Steaks

How To Grill Steaks

Now that you’ve got your grill ready, it’s time to make you the Grill Master. 

One: Only Flip Once

Keep away from overturning your steak, Let the Maillard reaction do its thing. That’s the technical name for the chemical reaction between amino acids and sugars, that gives browned and caramelized food its distinctive flavor. Ideally, you should turn the steak once on each side to get those cross-hatch grill marks, and only flip it once.

Two: Avoid Individual Steaks for a Crowd

For groups, don’t be afraid to go with one large steak, like a 32-ounce rib eye or a 36-ounce porterhouse. One large steak is easier to manage and monitor on a grill than multiple smaller ones, and armed with a good thermometer, any cook can nail a perfect medium-rare every time. Because of the internal variation of cooking times within one steak, you can accommodate diners who prefer medium rare and medium well.

Three: A Meat Thermometer is your Best Friend (even for pros!)

Temping a steak by hand can be tricky. It takes a ton of practice and a ton of experience. What happens when you hit a muscle knot? 

Don’t have a meat thermometer on hand? Try using metal cake testers. Metal cake testers are the best tool you can use for finding the perfect steak doneness. Insert the metal tester into the steak, leave it for five seconds, then pull it out and touch it to your lips or inner wrist. The internal temp of the steak will tell you how done it is. If it’s cold, your steak is rare; if it’s just warm, medium-rare; slightly hot, medium, etc. Plus, cake testers are less than a dollar, and you can get them in the baking section at your local store.

Here’s our steak doneness guideline:

Rare: 120-130°F 
Medium Rare: 130-135°F
Medium: 140-145°F
Medium Well: 150-155°F
Well: 160-165°F

Four: Let it Rest

Cooking the steak to 10 degrees below your desired temp and then resting it allows for the collagen in the meat to thicken the juices as it cools slightly. This results in a juicier steak than simply cooking it to temperature.

Just because the steak is removed from the pan does not mean it has finished cooking. Keep it in a warm place; you don’t want a cold steak, and rest it for about as long as you cook it. Most chefs suggest allowing the steak to rest for half the cooking time before serving. So if your steak takes 10 minutes to cook, let it rest for five minutes.

If you’re not able to keep the steak warm while it rests, or you want to eat it quite hot, return the steak to the grill after it’s rested and bring it up to the internal temperature of your preference before eating.

Love this blog? Share away!

Share on facebook
Facebook
Share on pinterest
Pinterest
Share on whatsapp
WhatsApp
Share on print
Print
Share on email
Email

Grilling Series #2: Prepping Your Steak

Prepping Your Steak

Epic steak starts right here. And you only need two things to make it happen: just flame and the perfect cut of meat.

First: Never cook a COLD steak 

When grilling a thick steak, you’ll want to take your steak out from the fridge about thirty minutes before you’re going to cook it but no more than two hours. This allows the meat to cook more evenly when grilling. This is also the best time to season it with salt.

Second: Use the RIGHT salt 

Sea Salt is always the way to go when seasoning a steak. The grains are medium-sized and the is perfect for grilled beef. Avoid table salt, iodized salt, or fine-grain sea salts as they have more weight to volume than larger grain salts, and you can easily over-season them. Just think medium grain, true sea salt.

Third: Make sure it’s super dry before it hits the heat.

We recommend patting your steak dry before putting on the grill to get that steakhouse quality sear. While high heat is a key process in creating that steakhouse sear, patting your steak dry is an important step for making sure your high heat isn’t wasted.

Love this blog? Share away!

Share on facebook
Facebook
Share on pinterest
Pinterest
Share on whatsapp
WhatsApp
Share on print
Print
Share on email
Email

Grilling Series #1: Know Your Heat

Know Your Heat

Setting up your grill right means better-tasting food, nothing that sticks to the grates or any uneven cooking. Ever. Whether charcoal, gas, and smoker grills, we’ve go you covered.

1. Create heat zones

On a kettle grill, bank coals in the center. Sear food in the middle, where heat is highest, then move it to the outer edges of the grill to perfectly cook without burning.

Then on a gas grill, leave one burner on high, set the middle burner on medium and the last burner to low. This way, you have a place to sear and grill steaks and other high-heat items, a medium zone in the middle for chicken and fish, and a low-heat area for longer-cooking items like sausages and brats.

2. Avoiding Grill Flair Ups

Flare-ups are an inevitable part of grilling. When they occur:

1. Move the food from the hot zone to the medium zone until the flames subside. You can also try putting down the lid. (If you’re working on a charcoal grill, close the top and bottom vents.) This deprives the fire of oxygen, which eventually extinguishes the flames.

2. A few squirts of water from a spray bottle can also dampen a flame. But use the technique sparingly. The water may stir up loose ashes or even spread the fire.

3. As a last resort, sprinkle salt or baking soda over the fire to extinguish it.

3. No Briquettes/Lighter Fluid

Always avoid lighter fluid if possible, and while convenient, charcoal briquettes can add an unpleasant kerosene flavor to grilled meats and should be avoided. If a wood/natural lump charcoal fire is unavailable or too inconvenient, propane grills will ultimately yield a better steak than charcoal briquettes and lighter fluid.

The best way to go, however, is hardwood or hardwood lump charcoal. Natural solid fuels add the most flavor to steaks, complementing their natural flavors instead of overpowering them.

4. Be Patient & Pre-heat

Be sure to let your charcoal fully catch and heat up before attempting to grill on it, about 20-30 minutes. Your fire should have a bed of red-hot coals, with high, even heat across the grill, and minimal flames and smoke. 

A hot cooking surface is extremely important to caramelize the outside of the steak and secure in the flavor. This method will give you a crispy-on-the-outside, yet moist-and-tender-on-the inside steak.

New to the Five Star Home Foods Family!? Welcome! Let’s get started with a chef’s sampler.

Love this blog? Share away!

Share on facebook
Facebook
Share on pinterest
Pinterest
Share on whatsapp
WhatsApp
Share on print
Print
Share on email
Email